This is part 1 of a n-part series. Like always, “the devil is in the details” ;-)
Why HA?
For the past 3 years I’ve been working with an OpenHAB2 (now 3) instance with self-wired sensors, then Tasmota-flashed ESPs, Shelly, ConBeeII (Hue & IKEA devices) and found enough reasons to look for a replacement now.
My currently most wanted features for home automation are:
- It hast to be free (opensource)
- Have geofencing rules & presence detection
- lights in specific rooms should trigger by movement at night or depending on light levels & they should be dimmed if it’s night.
- I’ve got some heating devices that should deactivate after a specific amount of time (timer functionality) or manually
- IKEA remote controls should be able to trigger actions (Zigbee)
- Non-technical users should also be able to access and control the devices
OpenHAB gave me lots of headaches with geofencing and time of day/light based rules. On one hand there’s not too much in ways of apps you can connect for geofencing and really predict if you’re at home or not.
On the other hand there is a lot of problems if you want to have your movement sensors react on you walking by, only when it’s dark or when it’s late at night. And then activate the lights, dimmed or at a specific setting.
The Update from OpenHAB2 to 3 also cost me a lot of troubles with my time calculations since Joda time was abandonden in favor of the defautl time implementation, which case a lot of my time-based rules to just stop working.
Another big downside was the rework of the UI handling, which basically killed my completely redesigned HABpanel :-/
Further I really want my existing setup to stay in place. Best case is a “silent migration” from OH3 to AH, since I am also using a lot of “Alexa” commands to start/stop devices.
Why the “container install”?
I thought about all that very long and hard: I wanted to not use the HA OS and supervised installation for several reasons, although there are a lot of reasons to use it for normal users.
This means: For you it might be the better to use the out-of-the-box solution!
I wanted to…
- … keep both systems alive at the same time to crosscheck migration efforts
- … be more flexible with installations (managed vs. individually configured)
- … not bound to specific versions of an OS etc.
- … be able to migrate all my stuff quite easily, broker config, influxdb, deCONZ
With the managed install and the “addons”, which are just managed docker containers of all the tooling I wanted to use, it would be really hard to have my data migrated easily. And setting deCONZ anew would really be a bummer. 30+ zigbee devices re-adopting etc.
In a nutshell it’s not the “not invented here” syndrome, mostly for my migration paths to be simpler or at all possible.
Current setup
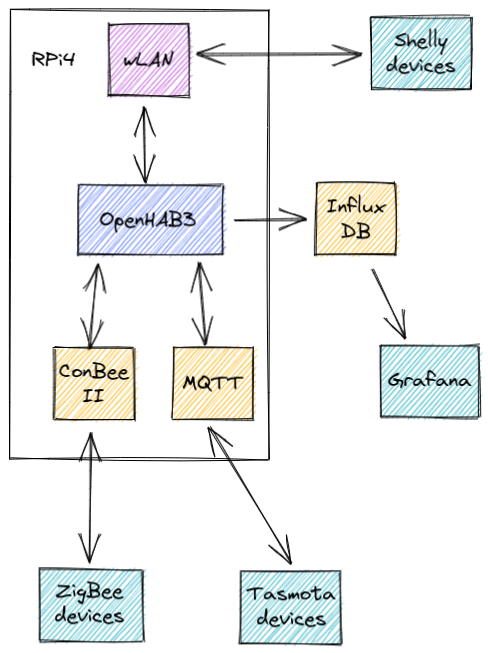
This is a brief overview of my current setup with OpenHAB3. I already migrated all of the time-based rules away from Jodatime to the Java time API (painfull).
All services are installed locally, no containerization.

Migration from OpenHAB3
The new setup is yet again a RaspberryPi4 with a SSD drive instead of a SD card.
Test-Setup
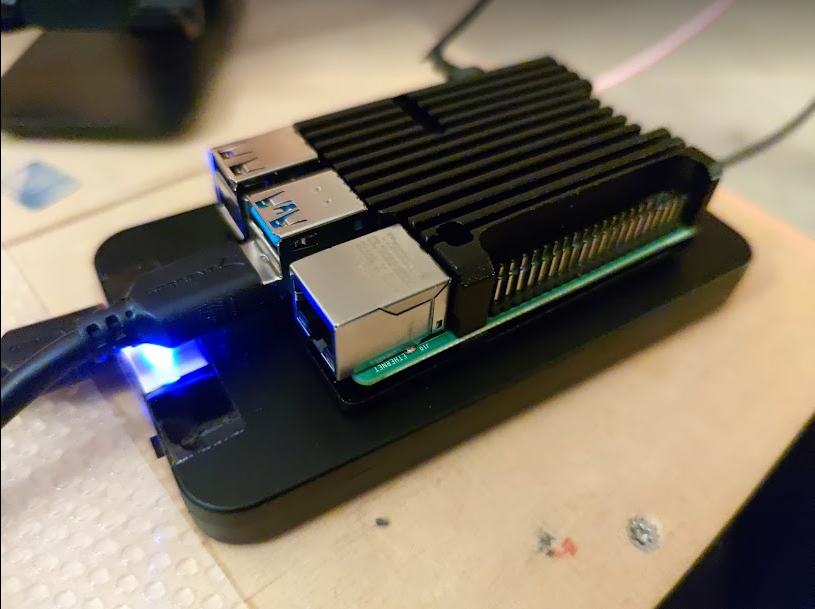
For rolling out, I’m using a Pi4b/ 4GB with the “armor” case and an external USB 3.0 case with 256GB of Crucial SSD.

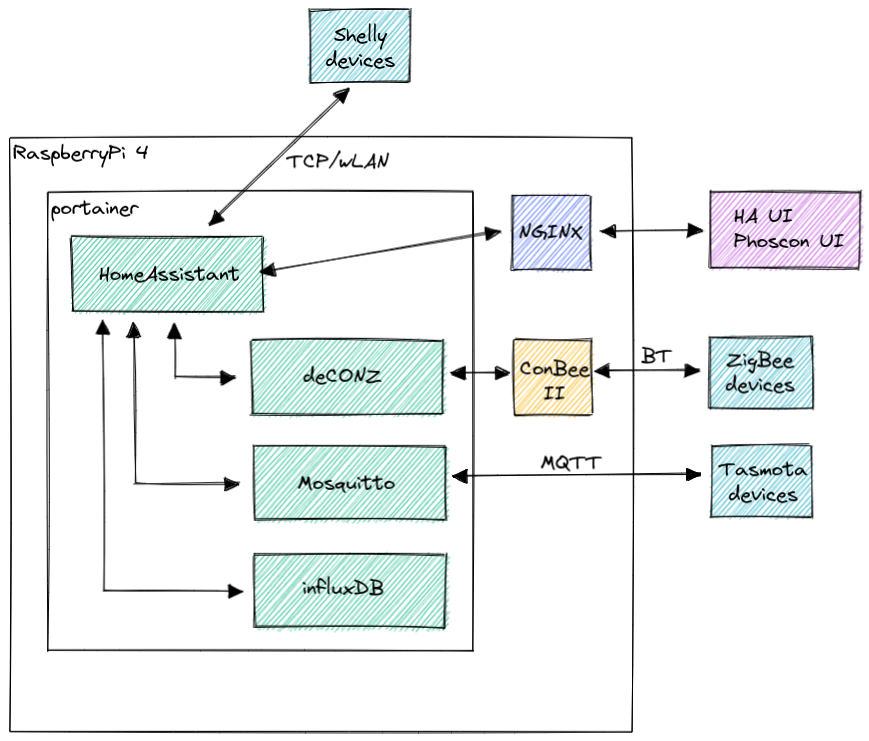
Ideal view of new setup

Attention: In this setup, nginx is planned to be installed locally (as a proxy with SSL termination), this might change. I’m synchronizing SSL certs from my external server to the internal network/pi to be able to have real wildcard certs with real domains in the internal net through pfSense’s DNS resolver. You can achieve similar results e.g. with using Traefik.
Portainer
Since I’m aiming to implement most of the services as docker containers, I chose portainer-ce to have a nice UI and configurations overview over my stack(s). Though I’m still in the phase of finding out how to best structure everything (stacks, containers, network), I wanted to share the inital configs and how to tackle the complexity. Portainer itself is “just” a container that helps you manage other containers. This is achieved through environments and stacks. You can also build teams with roles but that’s normally not needed in a typical “I use it at home” setups. Prerequisite is always a working docker environment + docker-compose. Because stacks are basically applications, consisting of one or more services, defined in a docker-compose file - which you can store as “application templates”.
I’m just going to use a stack with a few shared services.
On containers
There is an abundance of different container images, how-tos and general advice all over the net.
So the first steps are always:
- Know what you want to achieve
- Draw a diagram of your infrastructure to be (if it’s complex)
- Find commonly used containers (user rating, downloads, …) that fit your license model(!)
- Look for good configurability and especially good documentation
homeassistant
The installation is pretty straight forward. You just have to add a docker-compose YAML definition to your portainer stack:
version: '3'
services:
  homeassistant:
    container_name: homeassistant
    image: "ghcr.io/home-assistant/raspberrypi4-homeassistant:stable"
    volumes:
      - /home/ubuntu/homeassistant:/config
      - /etc/localtime:/etc/localtime:ro
    restart: unless-stopped
    privileged: true
    network_mode: host
Be careful: It’s using the host network, no internal net.
InfluxDB
Since I’m using influx for tracking all the values from my sensors and devices, I need the integration in HA aswell. Here, a compromise has to be made: All my historic data is written by OpenHAB and at the moment the agony of migration is not what I have time for. So I’ll create a new db and leave the old one.
I am still able to see the historical data and even have a dashboard for it.
A quick introduction on how to add influx and grafana to HA can be found here, although I only need the user part, an installation of both applications are already on my raspberry Pi4.
To make the influxdb run in portainer:
# docker-compose.yml
version: "3"
services:
  influxdb:
    image: influxdb:2.1.1
    container_name: influxdb
    environment:
      - DOCKER_INFLUXDB_INIT_USERNAME=homeassistant
      - DOCKER_INFLUXDB_INIT_PASSWORD=mypass
      - DOCKER_INFLUXDB_INIT_ORG=home
      - DOCKER_INFLUXDB_INIT_BUCKET=homeassistant
    ports:
      - "8086:8086"
    volumes:
      - "/home/ubuntu/influxdb/data:/var/lib/influxdb2"
      - "/home/ubuntu/influxdb/config.yml:/etc/influxdb2/config.yml"
Add some config to homeassistant:
# configuration.yaml
influxdb:
  api_version: 2
  ssl: false
  host: localhost
  port: 9999
  token: GENERATED_AUTH_TOKEN
  organization: RANDOM_16_DIGIT_HEX_ID
  bucket: homeassistant
  tags:
    source: HA
  tags_attributes:
    - friendly_name
  default_measurement: units
Tasmota devices
Watch a video on how to setup MQTT and Tasmota integration on youtube :-)
There was a slight problem using Mosquitto as a docker container, due to the listener-IP-binding. Especially since I am migrating from Mosquitto 1.x to 2.x - Where explicit listener definitions need to be defined for each address/socket etc. you want to listen to.
Best/easiest way for me to do this was:
# docker-compose.yml
version: "3.3"

services:
mosquitto:
  container_name: mosquitto
  image: "eclipse-mosquitto"
  ports:
    - "1883:1883"
    - "9001:9001"
  volumes:
    - "/home/ubuntu/mosquitto:/mosquitto"
  network_mode: host
Careful: I’m using the host network, since the container has to listen on its IP/incoming traffic. Probably you can also do this with an internal network, since you’re basically forwarding Host → docker:1883 but internally you’d need to listen to a specific IP address. This would need a complete subnetting config for your specific network + defining the container’s IP. So, for KISS’s sake, host network and be done.
With a config like this:
# mosquitto.conf
pid_file /mosquitto/mosquitto.pid
persistence true
persistence_location /mosquitto/data
log_dest file /mosquitto/mosquitto.log
password_file /mosquitto/password

# wLAN, temporary
listener 1883 192.168.2.121
# wired LAN
#listener 1883 192.168.2.120
# local listener, most likely just redundant
listener 1883 127.0.0.1
You can create the password file with default apache-utils. That’s just basic HTTP Auth with username password. For my usecase in the internal network, totally sufficient.
Tasmota devices then get either your public pi4 IP or a hostname. I am using my pfsense DNS resolver to manage that.
That’s it for today: Shelly devices, deCONZ migration, rules and UI will follow soon.
Go on with part 2